

This is my 200px by 200px blue square situated in the middle of my composition frame.

I created a blue square and named the solid shape 'Blue Solid 1'. The shape then appeared on my composition panel and in a box that is to the left of the timeline.
Every asset that you use in you composition becomes a layer, the same as in Photoshop and is displayed in this box.

This is the settings box for the solid layer that we are about to create. From here we can change its aspect ratio and the height and width of the object.
In the tutorial we were asked to create a solid square 200px by 200px.

In the tutorial we were then asked to create a layer. This would then appear on top of the composition. To this we clicked on the layer drop down menu at the top of the screen.
We were asked to create to then create a 'solid' layer.
Layer > Solid

I have also made the background for my composition green.

As we now have a composition the timeline panel now displays a ruler.

This box is situated in the top left of the screen. It tells you the the frame size and rate and also the duration of the sequence.

The timing on AE is split into -
hours / minutes / seconds / frames
In the tutorial we were asked to set the duration length to 5 seconds.

This is where you can change the 'start timecode' and the 'duration' of the sequence.

If you come across settings that are highlighted in AE, this means that they can be changed. You can either click on the highlighted numbers and type the new ones in or you can simply hover your mouse above the numbers, click down and drag to the left or to the right.
This way of changing data is unique to After Effects.

When it comes to editing a digital video sequence it is imperative that same standard is chosen to that of the camera it was shot on.
When working with video choose the DV option.
When working with images choose the square pixel option. other Adobe programs such as Photoshop use square pixels, so this means that your placed images in AE will not look stretched or distorted when you import them.

Also available from the composition settings box are a number of video presets. The shot above shows the presets that have been split into various categories.
At the top of the list are a number of NTSC and PAL presets.
These two presets are video standards that are recognised in different countries. For instance the NTSC standard is recognised in the US and other countries such as Canada, whereas the PAL standard is recognised in the U.K and other countries such as Australia and India.
This is similar to the different paper standards recognised around the world. For example the paper in America is cut to different measurements than paper in the U.K.
The main differences between NTSC and PAL standard are the frame sizes and the number of frames that are displayed per second.
NTSC - 27.97 frames per second
PAL - 25 frames per second

This is the composition settings box and this will appear once you have selected 'new composition'.
In this box we can change various details of the video for example -
- Frame rate
- width
- height
- resolution
- duration
- pixel aspect ratio

Every project that you start in Ae must contain at least one composition. This shot shows you how to create a new composition
composition > new composition

This is the third panel called the 'composition' panel. This is where your animation will be played back to you.

This is another of the three main panels in AE. This panel is called the 'timeline' panel. This is where things are arranged in order of sequence and for when and how long they will appear for.

This shows the way we can import various forms of media into the project window.
file > import
This is very much the same as the 'place' option on other Adobe programs such as Illustrator and Indesign.

This panel is one of three panels that make up the workspace on AE. It is called the project panel. Everything created in AE is called a project and this panel is where the media you want to use is stored, like a library. For example you can store pictures, sounds, clips and various other forms of electronic media here.

This shot shows the different settings that you configure AE to. This makes the program more manageable to whatever style of work you may be working on.
In the session we were told to set configuration to 'standard'.


This next shot demonstrates how all the panels on AE can be changed to suit your needs.
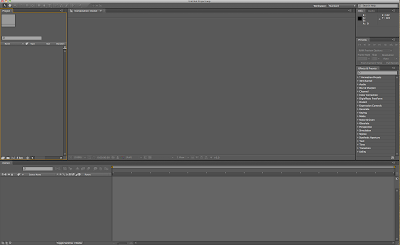

After the tip of the day window has been dismissed the applications panels will be made visible to you. These panels are your workspace and will be where your work will be produced.
What is Adobe After Effects?

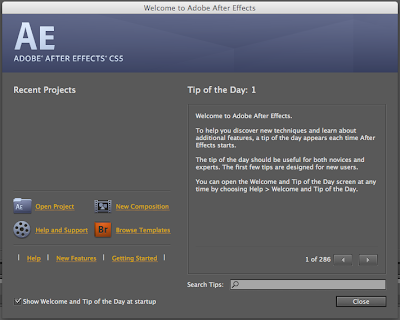
After clicking on the AE logo and opening the program this is the first screen we are greeted with. This is the 'tip of the day ' screen and it is a window that allows you to search for various hints and functions available to you on the program.
What is Adobe After Effects?
After Effects is an industry standard piece of software that is primarily used to produce motion graphics. It has some features that are similar to photoshop and is sometimes called 'Photoshop for video'.
The Program is unique because whatever you create always changes over time, this is what we call working 'Temporally'. The program allows you to work 'spatially' (like you would in Indesign, Illustrator or Photoshop).


